-
Notifications
You must be signed in to change notification settings - Fork 0
Adding new integrations into docs Fixes ENG-830 #11
New issue
Have a question about this project? Sign up for a free GitHub account to open an issue and contact its maintainers and the community.
By clicking “Sign up for GitHub”, you agree to our terms of service and privacy statement. We’ll occasionally send you account related emails.
Already on GitHub? Sign in to your account
Changes from all commits
af9109a
f01e035
273c481
b7fa5f2
d63dcaa
File filter
Filter by extension
Conversations
Jump to
Diff view
Diff view
There are no files selected for viewing
This file was deleted.
| Original file line number | Diff line number | Diff line change |
|---|---|---|
| @@ -0,0 +1,8 @@ | ||
| import nextra from 'nextra' | ||
|
|
||
| const withNextra = nextra({ | ||
| theme: 'nextra-theme-docs', | ||
| themeConfig: './theme.config.jsx' | ||
| }) | ||
|
|
||
| export default withNextra() |
Large diffs are not rendered by default.
| Original file line number | Diff line number | Diff line change |
|---|---|---|
| @@ -0,0 +1,5 @@ | ||
| import type { AppProps } from "next/app"; | ||
|
|
||
| export default function MyApp({ Component, pageProps }: AppProps) { | ||
| return <Component {...pageProps} />; | ||
| } |
| Original file line number | Diff line number | Diff line change |
|---|---|---|
| @@ -1,4 +1,4 @@ | ||
| { | ||
| export default { | ||
| "index": "Introduction", | ||
| "integrations": "Integrations", | ||
| "oneleet-agent": "Oneleet Agent", | ||
|
|
||
| Original file line number | Diff line number | Diff line change |
|---|---|---|
| @@ -1,5 +1,5 @@ | ||
| { | ||
| export default { | ||
| "1password-setup": "1Password Business Setup", | ||
| "jumpcloud-setup": "JumpCloud MDM Setup", | ||
| "hardening-kubernetes": "Hardening Kubernetes" | ||
| } | ||
| "hardening-kubernetes": "Hardening Kubernetes", | ||
| }; |
This file was deleted.
| Original file line number | Diff line number | Diff line change |
|---|---|---|
| @@ -0,0 +1,14 @@ | ||
| export default { | ||
| aws: "AWS", | ||
| azure: "Azure", | ||
| cloudflare: "Cloudflare", | ||
| gitlab: "Gitlab", | ||
| github: "GitHub", | ||
| "google-cloud-platform": "Google Cloud Platform", | ||
| "google-workspace": "Google Workspace", | ||
| jumpcloud: "Jumpcloud", | ||
| mezmo: "Mezmo", | ||
| microsoft365: "Microsoft 365", | ||
| supabase: "Supabase", | ||
| vercel: "Vercel", | ||
| }; |
This file was deleted.
| Original file line number | Diff line number | Diff line change |
|---|---|---|
| @@ -0,0 +1,13 @@ | ||
| # Microsoft Azure | ||
|
|
||
| ## Setup | ||
|
|
||
| To setup the Azure integration, navigate to the **Integrations > Add integration > Microsoft Azure** and click **Continue**. | ||
|
|
||
| Oneleet uses Microsoft Entra ID and Azure Resource Manager to monitor your cloud resource compliance. | ||
|
|
||
| Please ensure the following are true before proceeding: | ||
| - You are an administrator of your Microsoft Azure account | ||
| - You have access to the Azure Portal | ||
|
|
||
| Click the 'Connect' button to sign in with your Microsoft account. |
| Original file line number | Diff line number | Diff line change |
|---|---|---|
| @@ -0,0 +1,14 @@ | ||
| # Cloudflare | ||
|
|
||
| ## Setup | ||
| To setup the Cloudflare integration, navigate to the **Integrations > Add integration > Cloudflare** and click **Continue**. | ||
|
|
||
| Oneleet utilizes [Cloudflare API tokens](https://developers.cloudflare.com/fundamentals/api/get-started/create-token/) to retreieve Cloudflare assets | ||
|
|
||
| 1. [Open the Cloudflare dashboard menu for API tokens](https://dash.cloudflare.com/profile/api-tokens/) | ||
| 2. Select `Create Token` | ||
| 3. Select the `Read All Resources` template from the available token templates | ||
| 4. Edit the token name to your liking, a name like `"Oneleet Read-only"` works | ||
| 5. Scroll to the bottom, select `Continue to summary` | ||
| 6. Select `Create Token` to generate the token’s secret | ||
| 7. Copy the secret to the form on the Cloudflare integration setup page. |
This file was deleted.
| Original file line number | Diff line number | Diff line change |
|---|---|---|
| @@ -0,0 +1,12 @@ | ||
| # Gitlab | ||
|
|
||
| ## Setup | ||
| To setup the GitLab integration, navigate to the **Integrations > Add integration > GitLab** and click **Continue**. | ||
|
|
||
| An API key is required for the platform to access GitLab projects and group information. The following steps outline the process of creating a [Group Access Token](https://docs.gitlab.com/ee/user/group/settings/group_access_tokens.html) for the company's root level group. | ||
| 1. On GitLab open the left sidebar, select **Search or go to** and find your company's root level group. | ||
| 2. Select Settings > Access Tokens, select Add new token. | ||
| 3. Enter a name and expiry date for the token. | ||
| 4. Select the **Reporter** role for the token. | ||
| 5. Select the **read_api** scope. | ||
| 6. Select Create group access token. |
This file was deleted.
This file was deleted.
| Original file line number | Diff line number | Diff line change |
|---|---|---|
| @@ -0,0 +1,34 @@ | ||
| # Google Workspace | ||
|
|
||
| ## Setup | ||
|
|
||
| To setup the Google Workspace integration, navigate to the **Integrations > Add integration > Google Workspace** and click **Continue**. | ||
|
|
||
| ### Which permissions does Oneleet require? | ||
|
|
||
| Oneleet currently requests the following read-only permissions within Google Workspace: | ||
| - View audit reports | ||
| - View domains | ||
| - View user information | ||
|
|
||
| ### Which resources does Oneleet monitor? | ||
|
|
||
| Oneleet currently monitors the following on Google Workspace: | ||
| - User accounts | ||
| - GMail settings | ||
|
|
||
| ### Troubleshooting Connection Issues | ||
|
|
||
| If you are experiencing difficulties connecting Oneleet to Google Workspace due to sign-in restrictions imposed by your security policies, you will need to manually configure an exemption for Oneleet. This involves using a special identifier known as an OAuth Client ID to bypass certain API security policies and set the Oneleet Google application as a trusted app. Follow these steps to resolve the connection issues: | ||
|
|
||
| 1. Open your Google Admin console at [https://admin.google.com/](https://admin.google.com/). | ||
| 2. In the sidebar, navigate to **Security** > **Access and data control** > **API controls**. | ||
| 3. Click on **Manage third-party app access**. | ||
| 4. Select **Add app**, then choose **OAuth App Name or Client ID**. | ||
| 5. Enter the client ID `487371732991-7o3p4g81rmvdj7vj8sh9kh4rqfk5hhgc.apps.googleusercontent.com` and search. | ||
| 6. Select the Oneleet application from the search results (there should only be one listed). | ||
| 7. Choose the users or groups you would like to allow to log in to Oneleet's integration. | ||
| 8. Set the application status to **Trusted** and select **Allowlist for exemption from API access blocks**. | ||
| 9. Click **Finish** to complete the setup. | ||
|
|
||
| By following these steps, you should be able to successfully connect Oneleet to your Google Workspace. | ||
This file was deleted.
This file was deleted.
| Original file line number | Diff line number | Diff line change |
|---|---|---|
| @@ -0,0 +1,6 @@ | ||
| # Jumpcloud | ||
|
|
||
| ## Setup | ||
| To setup the Jumpcloud integration, navigate to the **Integrations > Add integration > Jumpcloud** and click **Continue**. | ||
|
|
||
| Oneleet needs an API key from your Jumpcloud account in order to read devices and policies. From the Jumpcloud console, you can find your API key by navigating to your profile icon in the top right, and clicking **My API Key**. |
| Original file line number | Diff line number | Diff line change |
|---|---|---|
| @@ -0,0 +1,11 @@ | ||
| # Mezmo | ||
|
|
||
| ## Setup | ||
| To setup the Mezmo integration, navigate to the **Integrations > Add integration > Mezmo** and click **Continue**. | ||
|
|
||
| Oneleet uses Mezmo's [Service Keys](https://docs.mezmo.com/docs/ingestion-key#service-keys) to access your Mezmo information. | ||
|
|
||
| 1. Log in to the [Mezmo Web App](https://app.logdna.com/account/signin) | ||
| 2. In the left sidebar click the `Settings` gear > `Organization` > `API Keys` | ||
| 3. Under `Analysis Service Keys` click `Generate Service Key` | ||
| 4. Copy your key's name and `Service Key` to the form at the bottom of this page. |
| Original file line number | Diff line number | Diff line change |
|---|---|---|
| @@ -0,0 +1,12 @@ | ||
| # Microsoft 365 | ||
|
|
||
| ## Setup | ||
| To setup the Microsoft 365 integration, navigate to the **Integrations > Add integration > Microsoft 365** and click **Continue**. | ||
|
|
||
| Oneleet uses Microsoft Entra ID and the Microsoft Graph API to query for your cloud resources. | ||
|
|
||
| Please ensure the following are true before proceeding: | ||
| - You are an administrator of your Microsoft organization. | ||
| - You have access to the Microsoft 365 Admin Center. | ||
|
|
||
| Click the 'Connect' button to sign in with your Microsoft account. |
| Original file line number | Diff line number | Diff line change |
|---|---|---|
| @@ -0,0 +1,8 @@ | ||
| # Supabase | ||
|
|
||
| ## Setup | ||
| To setup the Supabase integration, navigate to the **Integrations > Add integration > Supabase** and click **Continue**. | ||
|
|
||
| Oneleet uses the Supabase Management API to monitor your resources. | ||
|
|
||
| Please make sure that you have administrator access to connect your Supabase account. |
| Original file line number | Diff line number | Diff line change |
|---|---|---|
| @@ -0,0 +1,18 @@ | ||
| # Vercel | ||
|
|
||
| ## Setup | ||
| To setup the Vercel integration, navigate to the **Integrations > Add integration > Vercel** and click **Continue**. | ||
|
|
||
| Oneleet requires an API key to access your Vercel team. We'll walk you through the process of creating a [Vercel API Token](https://vercel.com/docs/rest-api#creating-an-access-token) for your company's Vercel account. | ||
| ### Creating an Access Token | ||
| Access Tokens can be created and managed from inside your [account settings](https://vercel.com/account/tokens). | ||
| 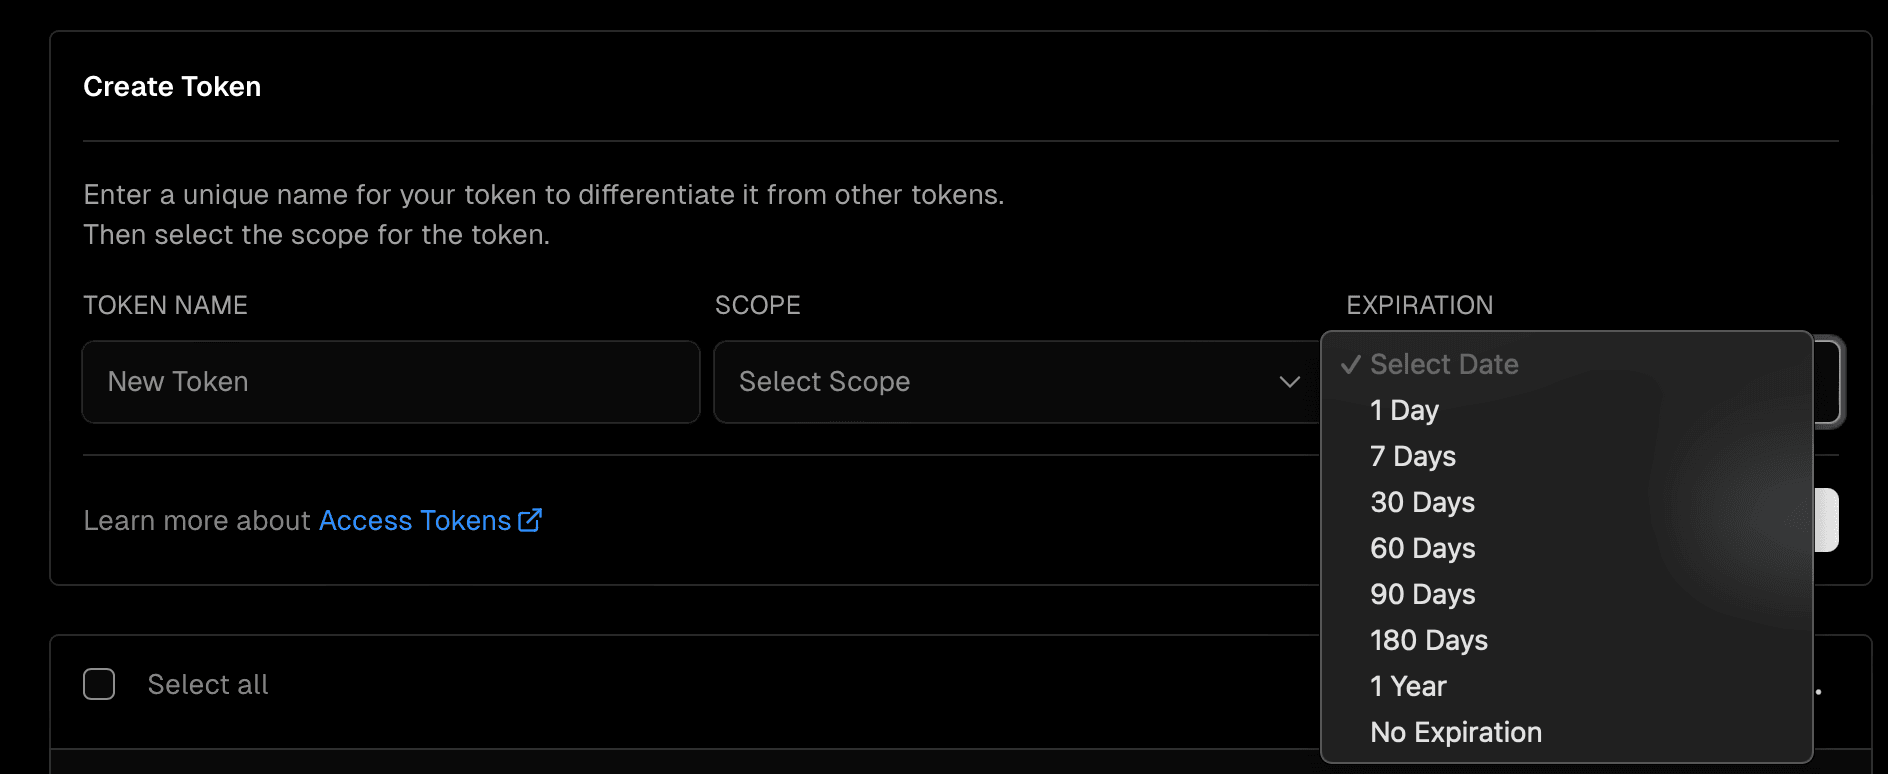 | ||
| 1. In the upper-right corner of your [dashboard](https://vercel.com/dashboard), click your profile picture, then select **Settings** | ||
| 2. Select **Tokens** from the sidebar | ||
| 3. Enter a descriptive name for the token | ||
| 4. Choose the scope from the list of Teams in the drop-down menu. The scope ensures that only your specific Team can use an Access Token | ||
| 5. From the **Expiration** drop-down, choose "No Expiration" to create a token that never expires | ||
| 6. Click **Create Token** | ||
| 7. Once you've created an Access Token, securely store the value as it will not be shown again. | ||
| ### Vercel Team ID | ||
| Go to your Vercel team's settings to find your team ID. |
This file was deleted.
| Original file line number | Diff line number | Diff line change |
|---|---|---|
| @@ -0,0 +1,6 @@ | ||
| export default { | ||
| setup: "Setup", | ||
| macos: "macOS Devices", | ||
| windows: "Windows Devices", | ||
| linux: "Linux Devices", | ||
| }; |
Uh oh!
There was an error while loading. Please reload this page.